Sunday, November 29, 2009
Machinist Boxes
First off. I am NOT a machinist. I love making small metal pieces out of larger metal pieces but what little I can do is self-taught.
Machinist's boxes are, to many, works of art. Whether made of wood or metal, they are a bit different than a carpenter's or mechanic's box. Machinist boxes are typically smaller and not as deep as other boxes. The tools stored are generally not as large but are more precise and far more expensive. This is why machinists boxes also contain tills and drawers that are lined with protective felt. Another unique feature is the locking front drop panel.
As a machinist progressed through his training, from apprentice to journeyman to professional, his box followed. In the wooden box world, it was common for a machinist to build his own box as part of his apprenticeship. I have heard that it was to show his skills and that to many it was sort of a right of passage. What made one decide to purchase a metal box and another to build his own, I cannot say. Most wooden boxes appear to be earlier. During WWII, there was a great need for machinists and other skilled laborers. The long process from apprenticeship to professional remained but doesn't appear to have been as much of a focus as the need for war production. This is only my opinion.
Kennedy is a name that is synonymous with quality and has always been the standard in metal boxes. Well-made and easy to pick out in a crowd, they have been around since the beginning of the 20th century. Kennedy still makes these as well as high quality mechanic's boxes.
Below is my box. This is a Kennedy 526 "Journeyman" box.
Below is a box I purchased from a neighbor. It was his father's Kennedy 520 "Apprentice" box. This box was built in the 40's and came to me full of nice American-made tools - a real find! In the accompanying paperwork were pay slips and a log of his training. The last entry is dated 1950. The box then sat essentially unused until I got it almost 60 years later. I use it frequently but I will leave the contents arranged as the original owner had them. I think that is only right.
Wooden boxes are still made today for those who chose not to build one. Some are Chinese junk and some are high quality. Union and Gerstner are quality vintage brands of wooden boxes and Gerstner is still made today. They go for $600 - $800! Ironically, antique Gerstners go for about the same amount.
Last is a box I just acquired and the one which means the most to me. This was my grandfather's. Built by him in the 30's or 40's, he worked for a time during WWII for Wright Aircraft Engines and retired from McDonnell Douglas in the 1960s. He chose to work mostly with wood in his retirement and made some stunning pieces. I remember this box sitting on his workbench when I would visit him as a child and is all I ever wanted of his since his death in 1992.
For various reasons, it took 17 years but, with the persistence of my father, I will now be able to preserve this box and what it stands for. Unfortunately, other relatives first stripped the requested tools from it but, while I am unable to preserve it as he had it arranged, I am grateful to have this box - made with his own hands. It has "him" all over it.
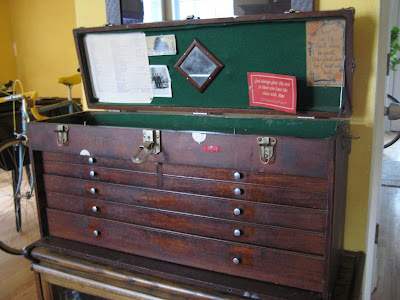
You can see where he carved his name in a creative way on the front. It is a large, heavy box and will need a little TLC but it is as unique as he was.
If you have a neat story of old tools and such, please post them on the KC CafeRacer Yahoo group page or e-mail them to me.
Saturday, November 14, 2009
Wednesday, October 21, 2009
Ralph Wayne's 2009
Always a great place to show up!
Thanks to Douglas for sending in these pics!
Had to start off with a Yamaha 2-stroke production racer. That Honda 400-4 is keeper too!
Nice BSA. Drips cafe racer!
Yamaha SR. Norton clone engines are always a nice place to start.
I would love a small displacement V-twin. Italian 350. Nice!
Excelsior with I/E head. I got there about 1pm and still missed this. Anyone know who it belonged to?
My offering. Lot's more attention than I thought. Remember that's a lawn mower engine!
The moderators always get the last word!
Thursday, June 18, 2009
Show Friday night
There is a shoe being hosted by the Kansas Short Grass Motorcycle Club in Lawrence. I'm planning on taking the Cylone Replica on it's first outing!
First Annual Invitational Motorcycle Sidewalk Show
Friday, June 19, 2009
5 PM to 9 PM
Vermont Towers Parking Lot
11th and Vermont Streets
Lawrence, Kansas
The Kansas Short Grass Motorcycle Club was founded in 1910 in Rexford, Kansas near Colby. The club’s founder, Dr. Benjamin J. Patterson, was elected President of the Federation of American Motorcyclists in 1913. The Club became famous both regionally and nationally for their guided tours through Colorado & Wyoming. You are cordially invited to join us this coming Friday June 19th between 5 PM to 9 PM for an evening of fun and friendship with the men and women of the world famous…
Kansas Short Grass Motorcycle Club
Be sure to pick up one of our great new t-shirts during the show!
Regional motorcyclists are invited to participate in the KSGMC’s First Annual Invitational Motorcycle Sidewalk Show for the retirees of Vermont Towers. All makes and models of motorcycles are welcome and participants must be 18 years of age unless accompanied by an adult. Bring your camera, lawn chairs and your motorcycle for display. We look forward to meeting you Friday. Be sure to tell your friends about the Kansas Short Grass Motorcycle Club!
Sunday, June 14, 2009
Monday, June 1, 2009
Tuesday, May 26, 2009
Monday, May 18, 2009
Decoking your silencers
Decoking your silencers is simply removing the build up of carbon, and in my case burnt-on oil, from your baffles. This is common in the two-stroke world but I must admit, I've never done it entirely. I have removed them before and sometimes they didn't come out willingly. I think I soaked one once in gas but very little crud came off. I usually replace the stock pipes/mufflers with chambers that don't have this type of baffle. These came from the '72 R5 and came out quite easily. There is a simple 8mm screw under the back of the muffler that holds each one in. You then take pliers and grasp a horizontal rod in the back of the baffle and twist it back and forth while pulling. It's all quick intuitive once you look at it. The factory recommends torching them every so many thousand miles so I fired up the OA set and after about 15 minutes they were both down to bare metal. You can see the after and before in the above pic. These were not bad at all and may not have even needed it. Some say they get so bad the bike runs poorly then they notice a huge performance increase once the baffles are cleaned.
Does it run better? Can't tell but I know that's one less thing in the back of my head. Timing will be next and is probably the most important setting on a two stroke bike. After that I don't mind taking off down the highway.
As an aside, there is a weird phenomenon that occurs when the motor hits the power band and you don't. Accordingly, I did a scary little slide backwards on the seat the other day - I'm just not used to these bench seats!
Friday, May 15, 2009
2009 HoAME Show
This is a good show. I'll admit, I have seen enough of the same BSAs and Vincents that show up every year BUT that's 'cause they are die-hards and hit all the local shows. There is always something good to see and good company to be seen with! This year we'll get to check out the local commercial aviation museum. I think we should meet for coffee and ride out together!
Good side story(and breaking the off-topic rule!): That airport reminds me of the time I went to meetings down there to discuss the restoration of a WW2 glider(delivered airborne troops). Bunch of old glider guys would show up. The organizer was a local author but he didn't own the plane. He certainly took charge though. Every meeting was drama as the aviation school there was selling out and they were loosing their free storage and work place for the thing. Whiteman offered to put it outside with their other display planes. "They would keep it up well every year." The group was split but keep in mind this was a cloth covered, all tube and plywood deal. It was coming down to donating the incomplete plane to a museum somewhere in Texas or placing it at Whiteman........ unless a private citizen could fund some better local plan. I knew it would deteriorate outside with the poor disinterested grunts slopping some OD paint on it each spring and knew the museum in Texas knew what they were doing with it. These poor vets were so attached to it since finding it in the backwoods somewhere in Michigan and starting it's restoration that they wanted it local so Whiteman was winning out. I dissented as I had no vested interest but I hated what was about to happen. I quit attending meetings. It was likely sold or went into storage at Whiteman as it wasn't complete enough to display.... another lost relic.
A few months later the "in charge" guy, who was kind of a creepy fast-talker type, overweight, and always in a cheap suit with a loose tie, called me and wanted a meeting with me.(!?) We met at Winsteads. I guess he had a side project of starting a local museum but didn't appear well-funded. My WW2 flight gear collection interested him and he suggested a donation. I dissented again and who knows what happened.
Maybe we'll see him there at the museum!
Just found this so I guess we know what happened.................
http://www.whiteman.af.mil/photos/media_search.asp?q=glider&btnG.x=0&btnG.y=0
Monday, May 11, 2009
My gara..... ummmm porch
Friday, April 24, 2009
Monday, April 20, 2009
Checking Spark Plugs
Since no one else seems to have anything to post, I'll continue.
Here's my luck with the new bike.
Friday, I go to check spark plugs before going for a ride and then delving into a potential air leak(surging at slow cruising speed). It's a two-stroke thing.
Right plug is galled from the start and i'm rolling out alu. threads with my pinky.
I'm tempted to just replace the plug but I pulled the right head.
Good thing I didn't just try to run it. BTW, this is called galvanic corrosion and it can happen to you too - anywhere there are dissimilar metals in contact.
I have a spare head but I had better pull the other to check both heads - in case that potential air leak was there.
Well one of the left cylinder studs came out of the block rusted to the sleeve nut!
Now I have to pull the unaffected cylinder to reinstall the stud correctly. I could have just screwed it all back in like a bolt but I'm a glutton for punishment!
Look what I see!
All this rusty grit falling onto the crank and into the case from all eight studs!
I found an RD350 gasket kit from a few years back (and a bunch of NOS cables I forgot I had!) so I can wrap this up this weekend.
Okay, that was easy. Now I see I have a missing exhaust stud. Made a new one. Looking at the rubber carb manifolds, I see they don't line up very well. Better port match those to eliminate that edge. A simple scribing shows the mismatch.
But look deeper. It's upside down but see how the iron cylinder sleeve has a lip at the intake port? I'll remove that while I'm at it.
Be careful as this is the intake valve of a two-stroke. Grind all the way into the cylinder, raising the opening even 1mm, and you can make the power very peaky. Modifying the height of the intake and exhaust ports is how you "recam" a two stroke. Simple to do but easy to make it unrideable.
Here you can see the port opened up.
You don't want to hog out the whole runner - just radius it at the offending part. I want to leave it rough in there as this helps with the fuel mix. Polishing intakes runners provided little gain and maybe even some loss. Also note how I ramped the cylinder sleeve to transition the runner to the port without a step. I never actually ground into the opening.
These things are how one would "blueprint" an engine. All is still stock but you gain all the possible efficiency possible before making other mods. The ports leading down into the crankcase can be matched as well BUT not without the case all apart so forget it. You 4-strokers will want to add a three angle valve job, a balance, and degree the cam.
Well I might as well pull the pistons, clean them properly and take a bunch of measurements. Regardless of the numbers, I'm not reboring this thing.
After hunting down a spare head in the shed, I decided I should paint the cyls and heads while it's all apart. See where this is all going?!
JP1 satin paint and bake at XXX for XXX minutes(turn off and go watch a James Bond movie). I like the new Bond as he kills indescriminately. The Walther PPK returns as well. Hey, anyone wanna go shooting? Anyway,
Common advice is to do this when the wife is away. My sis' redid her kitchen a few years ago so I combined her broken top and bottom ovens together to get one good one for the garage. Great for powder coating small parts - and this.
I had to sand off the fins but this is how it turned out.
Here's a before and after of the pistons.
3am. This is not to measure the rings but to show you the taper. These are known as keystone rings. The taper forms a wedge so that the cylinder pressure forces the rings against the cylinder wall. This also greatly reduces ring sticking.
New oils pretty much obviate the need for ring expanders. Both of mine in the top grooves were broken. I ended up leaving them all out even though I like to use castor-type oil. You 4-strokers can toss them all together. This is what the expanders look like.
Put the pistons back in before turning in.
Today, I broke a ring when reinstalling the right cylinder. Guess what? I'm now running one ring in the top groove of each piston! This wasn't my plan but was common in race motors of the time - this is my justification. And I'm NOT dumping $50 on stock rings when oversized piston/rings are $150. Not today, friends. Hack on! I have several other bikes to build before I go that deep on a new one!
Here she is back together. Not very snappy off throttle - needs some tuning - or is that just new blowby? ;)> Feels fine when gettin' on it. Break-in period? Screw that!
Thursday, April 9, 2009
"Pay no attention to the carb behind the side panel"
I don't know how many times I've heard guys say they are afraid to disassemble a carb. "I'll just take it to someone." $400 later, their vintage bike "runs great!" But what happens if it starts acting up again?
I dare say, knowing the basics of a carb is a right of passage for vintage bike owners. Some might say one has no business buying an old bike if they can't sort the carb - at least to stock configuration.
I won't go that far but guys, these are so simple, it's amazing they work so precisely! Sure, the new stuff intimidates - no, wait, irritates me, but these old Mikunis(typical on Yamahas) and Keihins(Hondas) area a cinch so insult yourselves no longer. If you ever built a model as a kid, cooked a complex recipe without an ER visit, or showered yourself without assistance you can do this. Most parts fit together only one way and usually you have another carb to reference. Mikuni's manual is available free online at Sudco's site and elsewhere. It's great info but I did a bunch before finding and reading it. Honestly, once you've done it, you will likely never need to read instructions again.
Here are the tools needed to completely "rebuild" a VM (round slide) Mikuni:
Playa please! A Phillips and small standard screwdrivers, a 6mm socket or wrench(main jet), and a 10mm for the float needle seat. That's it! Few specialty tools exist for most older carbs. Of course syncing them should follow but that's fun to do using a couple of WD40 straws or mercury sticks for you diaphragm guys(insert joke here). There's no doubt you will feel like your bike runs better even if all was okay. The simple adjustments alone might make things better.
The new R5 starts easily but won't stay running on a ride. Actually, the problem is mostly when braking and I remember something weird when using the signals(something foreign to me!) so it's likely a ground but I'm on a carb rant right now so..... Fortunately I enjoy working on these as much as riding them. Today Linda said, "I can't see you buying a turnkey bike." Touche'!
The battery reads 12.4V and 14.3V at 3000rpm (a quick and dirty battery and charging test). There was a loose wire at the battery but that didn't fix it. There's more to check on the R5 - plugs, coils, points, grounds, etc. but the carbs simply have to come apart on any old bike you pick up.
Side rant: Well, if I buy an older bike(pristine tank or not) and it doesn't have inline fuel filters, I can barely sleep until I have cleaned the carbs and put filters in there. It's funny how one symptom can mimic another system problem but that's an old bike for you - and carbs are often it. Cleaning them and reinstalling without filters is plain silly(been there). If you ignore this advice, you will either be best friends with an under-challenged mechanic or become proficient at cleaning your carbs - maybe even good at it on the side of the road in the rain.
Also, second to the, "I'll take it somewhere." is the, "I bought a rebuild kit...."
I'm no pro but with 2-strokes you become good friends with your carbs so I have disassembled, rebuilt, and/or modified carbs a couple dozen times and I have NEVER bought or needed a rebuild "kit". It's like paying for a "tuneup" on a new car with EFI and computer controlled ignition(what do you think they do?!). Anyway, perhaps there is a leak that could benefit from a new gasket but there is little in the kit that will make your old carb work better than cleaning and reusing the old parts. I have bought various jets or emulsion tubes(for mods or tuning) but I can't even remember buying gaskets - well maybe on the Bings(BMW)......... and Amals are gonna leak anyway! CVs are different - I would buy a diaphragm rather than repair one but there are tricks for that too.
This is not a tutorial but just a motivation. Spray carb cleaner is nasty stuff but works great. I just use my parts washer and a brush. If I had a choice between cleaner and compressed air, I'd go with the air. Combine the two and you definitely need safety glasses(I'm typing through misty glasses now). I take a mental note of the position of the adjusting screws - you can always return to that as a baseline although they might have been screwed with to compensate for dirt or poor tuning. I then disassemble, clean, then blow the cleaner out of all the orifices and jets. Takes maybe an hour but I've done it in 15min and I've taken a couple hours while listening to tunes. Don't be tempted to rush or to jam any metal tools into holes - especially the smallest ones(insert another joke here). Remember to be careful as these are pot metal and can mar easily. Don't scar up the carb body with pliers etc. If such coercion is needed, use a towel to protect the metal. Chasing a small orifice with a wire is a no-no as is drilling out a jet. I have coaxed crud out with the nylon bristles of a parts brush and have chased jets with individual bristles in the washer but that's it. If it won't come off with cleaner and a cleaning brush, it's unlikely to come off in use.
Finally, don't leave home without these.
I need to buy a bunch - I think I've picked them up at any dealer counter for about $1 apiece.
Don't be afraid of these things. If you have a problem there's lots of help online and that is what the KC cafe racers group is for........ at least give it a shot!
UPDATE: Rode on the R5 today to the dreaded Kansas inspection station manned by the cargo-pants wearing HiPo. No issues there but the bike started easier and ran much better too. Plenty of power and didn't die once. See! Still need to tune the ignition, etc. but what I thought was electrical wasn't at all. The fuel delivery was just too marginal - fuel fouling a plug or something. Dig in!
Tuesday, April 7, 2009
New Speedo
Update:
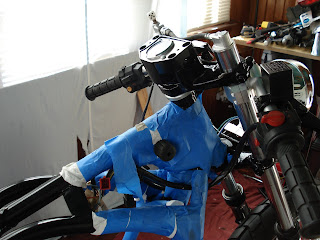
I put a digital speedo on the bike today. It is a 2" digital one. I am going to have to buy a universal sensor that mounts next to my sprocket to calibrate it. For complete pics, just visit my blog.
http://www.anatomyofacaferacer.blogspot.com/
I put a digital speedo on the bike today. It is a 2" digital one. I am going to have to buy a universal sensor that mounts next to my sprocket to calibrate it. For complete pics, just visit my blog.
http://www.anatomyofacaferacer.blogspot.com/
Saturday, April 4, 2009
What I messed with Saturday
Sun came out so I wheeled out the beast.
It's louder in person. I have a ways to go but last year's goal of Ralph Wayne's passed so maybe this year? May get laughed at but if I mow Ralph's lawn...........
Project "81"
Hello all,
I am a relative "newbie" to the cafe racer scene. I am currently working on a 1981 CB750. I'm trying to create a simplistic roadracer out of this DOHC CB. If you would like to follow the project, just go to www.anatomyofacaferacer.blogspot.com
Welp, seeya later
Pete
I am a relative "newbie" to the cafe racer scene. I am currently working on a 1981 CB750. I'm trying to create a simplistic roadracer out of this DOHC CB. If you would like to follow the project, just go to www.anatomyofacaferacer.blogspot.com
Welp, seeya later
Pete
Thursday, April 2, 2009
New toy
Obtained from another distinguished member. It is mostly original. Linda wanted me to have a "two-seater" for gelato runs so I added an R5 to fill the gap in my collection of the 350cc two-strokes Yamaha offered.
Most of the components are not only "usable" but are in great condition. I plan on removing the mirrors, swapping to lower euro-style bars, new tires, and some fork and seat work.
Low enough miles that the recommended head decoking isn't even required yet.
Sunday, March 29, 2009
Dave's project (dmar836)
I'll start. I'm sure most of you know about my project..... of two years! It seems to be moving slower now but this is the longest I've kept up on it since starting. Buying parts to bolt on is one thing; fabricating them or making them look the period is another. I've learned a ton on this!
Time is coming to start on the cafe bikes so we'll see if I can get it done in time for Ralph Wayne's this year.
Here's my blog about it.
http://boardtracker.blogspot.com/
Subscribe to:
Posts (Atom)